The previous articles can be found HERE and HERE. We have created the following Business Entitiy structure in them.

In this article, we will focus on two topics:
- Creating a Consumption Model
- Creating and deploying a Perspective
Part 1
We will start by creating a model based on an already created Entity structure. To do this, go to Business Builder and select New Consumption Model.

First, we enter the model title (in our case, SALES_MODEL). Next, click the Step 2 button.

In the next step, select Fact Source (in our case FCT_SALES) and click the Step 3 button.

Click the Createbutton to finish creating the model. The model graphical interface should appear.

How to add a dimension to the model:
a) Aby wykorzystać wcześniej zdefiniowane asocjacje klikamy na tabelę FCT_SALES na środku interfejsu, a następnie wybieramy opcję Show Source Graph.

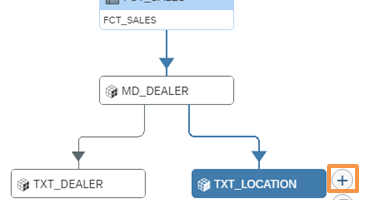
- b) We can see our connection to the MD_DEALER table. In order to consume the descriptions, however, we must go a level deeper. To do this, click on the table and select Expand.

- c) The previously created association hierarchy will appear on the screen. To add descriptions, select one of the elements and then select Add Source Context.

- d) A new screen will appear. Click on the Step 2 button.

- e) Now we can preview how the data will be linked together - we can see how the system uses MD_DEALER to get the location for the dealer and then reads the description from TXT_LOCATION. To accept, click the Create button.

After adding a new dimension, the system takes us back to the preview of the entire model. To add descriptions for the Dealer, we have to repeat the steps from sub-point a), this time choosing TXT_DEALER as the Source Context. Finally, our model should look like the one below : (notice how MD_DEALER operates as transitional table and that we don’t need to add it directly to the model):

Next, add Measures using the Measures tab (similar to Analytical Dataset).

In the Attributes tab, we also add Dealer and Location objects.

In the General tab, select the Allow public data access option and save the model. Click on Data Preview to see results of our work.

Part 2
Now we will focus on creating a perspective. Perspective is a saved configuration of a model that we can consume in the SAP Analytics Cloud environment. It works in a similar way to Query in classic BW.
We can create a perspective from the data preview screen – use the Data Preview interface to change the configuration however you like and then select Save New.

Provide a description and technical name for the perspective, and then press the Save button.

Aby perspektywa była widoczna w SACu, potrzeba ją jeszcze udostępnić. W tym celu przechodzimy z powrotem do edycji modelu, i w zakładce Perspectives tab, click the Deploy.

Now, using the built-in SAC environment (or our own tenant), we can read the data contained in the perspective.

This ends our series of articles on the business layer in SAP Data Warehouse Cloud. I hope you found it to be an useful introduction to the technology and a good resource for understanding new concepts and terminology :). A model created in this way can be further improved using technologies available in DWC, e.g. by defining time dimensions.
If you want to learn more, please refer to the offical documentation which can be found HERE


Pingback: Warstwa biznesowa w Data Warehouse Cloud – część 2 – Ad-Astra Consulting
Pingback: Warstwa biznesowa w Data Warehouse Cloud – część 1 – Ad-Astra Consulting